
IMPORTANT: Setting the nm=”epic.com” allows users to use 1 tap autofill and does not require the user to select from a list of credentials.
Configure Force Quit of the Epic Rover App
Mobile Access Management supports logout of Epic Rover by force quitting the app to clear the current user session.
For iOS, select the Epic Rover item in the Check In action app list to force quit Epic Rover during a check in.
Epic Rover will be logged out, and on the next check out will prompt the next user to log in.
This supported logout method affects the device only, and does not communicate the logout to the Epic environment.

Configure Epic API Logout
Use the Epic API logout feature to disassociate a user from a device in Epic and prevent push notifications (messages, alerts, or calls) from being sent to the device after check in.
Supported Epic Apps
This feature is compatible with Epic Rover, Epic Haiku, and Epic Canto apps on iOS and Android and should be used together with a force quit logout action.
Epic Documentation
For more information, see the Epic Galaxy documentation:
Interconnect User Case Guide – Disassociate a Mobile Device.
Requirements
- The Epic environment (Interconnect Server) must be reachable from the MAM server and have a valid TLS certificate.
- Minimum Epic version. The integration requires Epic November 2023 release and later.
- Create and Associate a New Background User. Steps apply to Epic February 2024 or later.
In Epic, create a new background user for the Interconnect OAuth2 back-end service-no specific security points or classes are required.
-
- Associate the new background user with the Interconnect OAuth2 back-end service:
- On the Interconnect Administrator’s menu in text, select OAuth2 Management, then Environment-Specific Client Settings.
- Select Create/Edit Settings and enter Imprivata Mobile Access Management Connector in the “Client” field.
- Specify the background user that you created in the “Background user” field.
- Specify the background user that you created in the “Associated User” column.
- Associate the new background user with the Interconnect OAuth2 back-end service:
- App Configuration. In your MDM, assign the Epic mobile apps two AppConfig keys. See below.
- This feature utilizes the DisassociateMobileDevice Epic API which is often included in customers’ existing Epic licensing. Customers are encouraged to check with their Epic representative to confirm.
Step 1: Configure MDM AppConfigs for Epic App
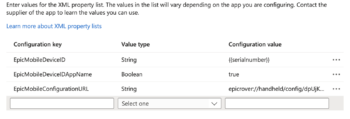
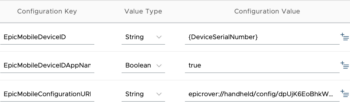
In your MDM, for the Epic app (ex. Epic Rover), configure the app and set the following AppConfig key/value pairs.
| Configuration Key | Value Type | Configuration Value | Description |
|---|---|---|---|
| EpicMobileDeviceID | string | {DeviceSerialNumber} * | Sets a unique MDM device ID for use with Epic API logout. |
| EpicMobileDeviceIDAppName | Boolean | true | Enables the Epic App name to be appended to the unique install ID. This allows for different app installations running on the same device to be uniquely identified. |
| EpicMobileConfigurationURL | string | epicrover://handheld/config/XXXX | The unique Epic configuration URL. To obtain the EpicMobileConfigurationURL for your environment, contact your Epic administrator. |
* The unique value configuration value for EpicMobileDeviceID will be based on how your MDM treats device serial numbers.
Microsoft Intune
- In the Microsoft Intune admin console, select the app to configure from the Associated app.
- Click Configuration settings and select Use configuration designer from the Configuration settings format list.
- Add a new key for EpicMobileDeviceID AppConfig. Set the Value Type to String, and set the Configuration Value to {{serialnumber}}.
- Add a new key for the EpicMobileDeviceIDAppName. Set the Value Type to Boolean and set the Configuration Value to true.
- Add a new key for the EpicMobileConfigurationURL. Set the Value Type to String, and set the Configuration Value to your unique Epic configuration URL.
Omnissa Workspace ONE
- In the Workspace ONE UEM console, specify the user groups that will receive the Epic app.
- On the distribution screen, name the assignment and in the Assignment Groups field, enter the name of the user group or smart group.
- From the menu on the left, click Application Configuration.
- Add a new key for EpicMobileDeviceID AppConfig. Set the Value Type to String, and set the Configuration Value to {DeviceSerialNumber}.
- Add a new key for the EpicMobileDeviceIDAppName. Set the Value Type to Boolean and set the Configuration Value to true.
- Add a new key for the EpicMobileConfigurationURL. Set the Value Type to String, and set the Configuration Value to your unique Epic configuration URL.
To validate the Epic app AppConfig has been applied:
- Open the mobile app, tap the environment selector at the top of the login window, tap the Back button in the top left, then tap the Identifier button in the bottom left.
This should display the Install ID in a format of the device’s serial number with the app name directly after. For example, J4X7X22WGARover.
If the Install ID is still a long alphanumeric string, try reinstalling the app. The Install ID must match the device’s serial number with the app name appended, or the logout action will fail with the error “…Install ID not found.”
Step 2: Request MAM Connector
NOTE: Some steps in this procedure require assistance and coordination between the Imprivata Epic team and Epic, and may take some time to complete.
In Epic Showroom, click Request Imprivata Mobile Access Management Connector to request access to the Imprivata Connector from the Imprivata Epic team.
The Imprivata Epic team receives a notification of your access request and approves it. During this time, you will see a Pending status on your request in Epic Showroom.
When the request is complete, your Epic Showroom displays a status of Ready.
Step 3: Configure Epic API Logout in MAM
To configure Epic API Logout in MAM:
- In the MAM admin console, navigate to Admin > App Logout. In the Epic API Logout section, click Add Epic Environment.
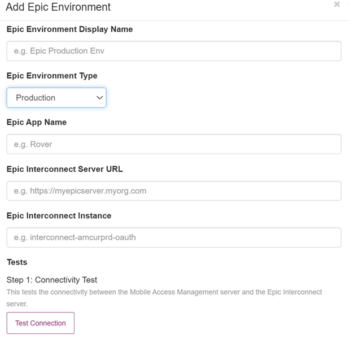
- In the Add Epic Environment dialog, supply the settings for your Epic environment:
- In the Epic Environment Display Name, type a descriptive name.
- In the Epic Environment Type, select either Non-production or Production.
- In the Epic App Name, type the Epic app name, for example: Rover. Epic App Name name is case sensitive.
- In the Epic Interconnect Server URL, type the URL of the Epic Interconnect Server.
- In the Epic Interconnect Instance, type the instance name, for example: APIProxyPRD or APIProxyTST.
- In the Tests section, click Test connection to test the connection between the Mobile Access Management and Epic Interconnect servers. Authentication failures are expected until step 3 is complete.
- Click Save to save the configuration.
The MAM server generates a JWK URL that the Imprivata Epic team will use in the next step. - Imprivata recommends setting up both Production and Non-production environments at the same time.
No actions will be taken in either environment until ‘Step 5: Add Logout Actions to the Check In Device Workflow’ is configured.
- The Imprivata Epic team uploads the JWK URL generated by the MAM server to Epic.
NOTE: It may take up to 12 hours to sync the JWK URL. During this time, authentication to your Epic environment will not succeed.
The Mobile Access Management server now has access to communicate securely with your Epic environment.
Access to Epic Showroom is limited to your organization’s Epic administrators.
Step 4: Test the Epic Logout API
After Imprivata has approved the connection and the environments sync, perform a logout test. This tests the logout API call on a device without performing a Check In workflow.
- In the Add Epic Environment dialog, in the Tests section, type a device serial number in the Device Serial Number box.
- Click Test Epic API Logout.
If successful, the Epic app is immediately logged out and returns to its login screen. This simulates the behavior that will take place during a Check In Workflow.
Step 5: Add Logout Actions to the Check In Device Workflow
For devices with Epic apps, add a Check In Device workflow with logout actions for Epic API Logout.
In the Check In Device dialog, select Epic API Logout.
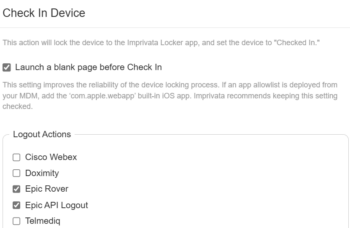
NOTE: API requests to Epic may fail with ‘…Install ID not found…’ if no user has yet logged into the app after applying the EpicMobileDeviceID and EpicMobileDeviceIDAppName AppConfig.
This API failure will not fail the Check In workflow and the force quit app action will proceed normally.STEP 5: Add Logout Actions To The Check In Device Workflow’ is configured.