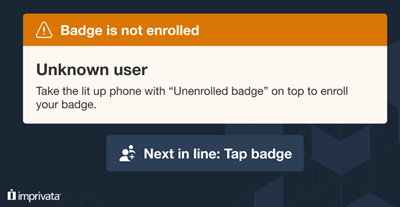
This feature allows for the Launchpad app to display improved guidance to your end users on a small screen attached to the Smart Hub.
- This feature allows you to switch the Launchpad app’s display from the default admin display (similar to the Launchpad Details page) to a user-friendly display focused on checking out and checking in their devices. This feature does not replace the Launchpad Details page available in the MAM Admin console.

- The feature works with existing Check Out and Check In Workflows in your organization. It will not display any other Workflow actions or deployments.
- For IT staff, the Launchpad app displays information on the connectivity status between the Launchpad, its Smart Hub and proximity card reader, and the devices.
Expected Behavior
When the feature is enabled:
- The UI displays in full screen mode
- The UI is forced to the front to prevent system messages from overlaying the UI.
The Launchpad app displays a home screen with the following Check Out and Check In Workflows:
Check Out Workflow
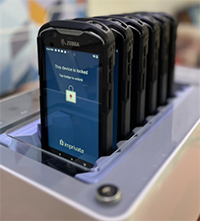 |
Devices are locked and charging in the Smart Hub. |
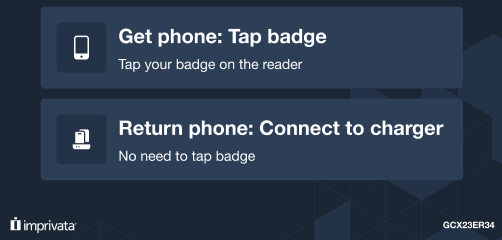 |
The Launchpad home screen prompts the user to check out a device. Depending on the organization’s authentication methods, the user:
|
|
|
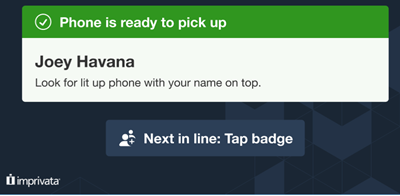 |
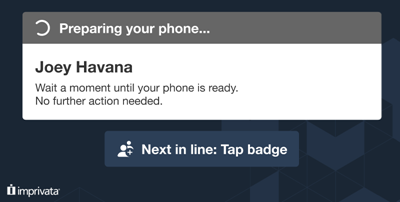
The Launchpad prompts the user to take the lit device labeled with their name. |
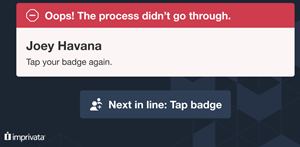 |
If a device fails to check out, the Launchpad prompts the user to tap their badge again. |
Check In Workflow
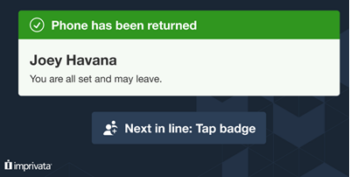 |
At shift end, the user returns to the same Launchpad they checked out their device from.
The Launchpad home screen prompts the user to check in their device by plugging it into the Smart Hub. |
System Requirements
Take note of the following system requirements:
MAM Launchpad Requirements
- MAM Launchpad computers must be running the MAM 6.7 or later Launchpad software. Launchpad computers running MAM 6.6 or earlier are not supported.
- Mac Launchpad computers must be running macOS 15 or later.
- Windows Launchpad computers must be running Windows 10 or Windows 11.
- Set up Launchpad computers for unattended use. For more information, see Configure Unattended Launchpads.
- No attached keyboard or mouse.
IMPORTANT: Do not have a mouse and/or keyboard attached to the monitor. Closing the UI shuts down the Launchpad.
Display Requirements
- Runs on an external monitor plugged into the Launchpad (Mac or Windows)
- Responsive design to work on a small screen (7″) or larger screens (20 +” monitor)
- Optimized for 1024 x 600 resolution
- Requires a connection to the Launchpad
- USB for power (or the monitor could be plugged into a wall outlet)
- HDMI for display
Hardware Requirements
For the best end user experience, Imprivata recommends using the Launchpad Display software in combination with the Bretford Smarthub Display Base. This is available to customers for both new purchases and retrofit of existing Bretford hardware in the following sizes:
|
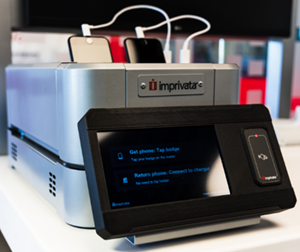 |
For more information on ordering, contact your customer success manager or account manager.
For further information on all supported hardware, see the system requirements.
MAM Check Out Workflow Requirements
Take note of the following Check Out Workflow requirements:
- Ensure that your Check Out Workflows do not include an On Failure action. For more information on Check Out best practices, see the MAM best practices guide.
Compatibility
Take note of the following:
- The End-user Display feature is not compatible with Launchpads registered via SAML.
Configure the Launchpad Display for End-users
Configure the feature by one of the following methods:
- From the Admin Console > Check Out settings. You can select all Launchpads in your organization, or individual Launchpads.
- From an individual Launchpad, using its Launchpad Options.
Configure Multiple Launchpads
To configure one or more Launchpads to display the End-user Display:
- In the MAM admin console, navigate to Admin > Check Out > .
- In the Launchpad Display for End-user section, click Configure.
By default, all Launchpads are displayed in the Admin Display column. Launchpads in Admin Display will show the list view Launchpad user interface. - Move the selected Launchpads from the Admin Display column to the End-user Display column and click Save.
NOTE: The Admin Display column only displays Launchpads running 6.7 or later software. This is by design; Launchpads running 6.6 or earlier do not support this feature.
Configure an Individual Launchpad
To configure an individual Launchpad to display the End-user Display:
- In the MAM admin console, navigate to the Launchpad List and select the Launchpad.
- In the Launchpad Actions menu, select Launchpad Options.
- In the Launchpad Options dialog, switch End-user Display to ON. Click Save.
- Restart the Launchpad.
Manage a Launchpad Running in End-user Mode
As an administrator, to interact with a computer (Mac or Windows) running the Launchpad in End-user mode:
- In the Launchpad Actions menu for the selected Launchpad computer, select Launchpad Options and switch End-user Display to OFF.
- When finished interacting with the computer, switch End-user Display to ON.
Known Issues
Consider the following known issues with this feature:
- Interactions with macOS updates and computer restarts
After a macOS update or when the Mac Launchpad restarts, the Launchpad Display for End-users does not launch automatically in full screen.
To work around this issue, at the Are you sure you want to restart your computer now? dialog, clear the checkbox for the Reopen windows when logging back in option. - Launchpad cannot force itself to the front when it doesn’t have focus in the browser window
This issue occurs when some app takes focus from the browser window, taking focus from the Launchpad. When the Launchpad doesn’t have focus, it cannot force itself to the front.
To work around these issues, from a remote computer, in the Launchpad Actions menu for the selected Launchpad computer, select Launchpad Options and switch End-user Display to OFF and then back to ON. Restart the Launchpad. This launches the End-user Display in full screen mode. - When the Launchpad crashes upon startup, the Launchpad Display for End-users will hang on a white screen.
This behavior may indicate a configuration issue on the Windows computer which requires additional action from the administrator.
To resolve this issue, close the Launchpad or restart the computer. - Administering Windows Launchpad via RDP locks the screen and the Launchpad Display for End-users no longer is displayed.
This behavior occurs when the screen locks as the remote session takes over the primary display.
To resolve this issue, the administrator must restart Windows before ending their session so Windows automatically logs in and relaunches the Launchpad app.


