NOTE: This topic applies to Android devices and Omnissa Workspace ONE (formerly VMware Workspace ONE). For iOS devices and Omnissa Workspace ONE, see MDM Integration: Omnissa Workspace ONE – iOS
Mobile Access Management has deep integration with Omnissa Workspace ONE. The instructions below describe how to set up Mobile Access Management to use Workspace ONE APIs.
API Integration
API integration adds many additional features to customize your Workflows, including unenroll-before-enroll, assigning organization groups, setting friendly names, and more.
- Android Devices — API Integration is required for Android enrollments.
Android Requirements
- The Imprivata Locker Android app must be granted Lock Task permissions in the MDM.
- The Imprivata Locker app must be added to the allowlist in your MDM.
Best Practices
- Imprivata strongly recommends you use a local Workspace ONE admin account for Mobile Access Management APIs and avoid Active Directory accounts. Active Directory admins slow each API call by two seconds, which will make your checkouts slower.
- Set up certificate authentication for the local admin user, which will avoid periodic password expirations.
Step 1: Configure Mobile Access Management
- In the MAM console, navigate to Admin > MDMs. Click + Add, and select Workspace ONE.
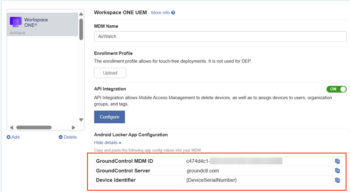
- Switch the API Integration setting to ON. Click Configure.
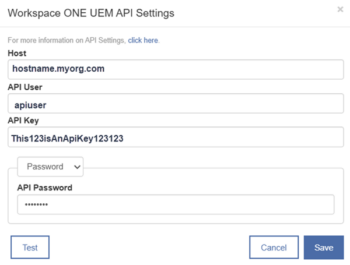
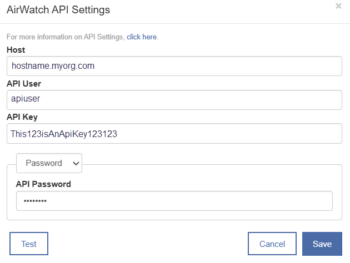
In the API Settings dialog, add API settings that you obtain from the Workspace ONE admin console.
Step 2: Enable REST APIs in Workspace ONE
- In your Workspace ONE console, visit Groups & Settings > All Settings > System > Advanced > API > REST API > General.
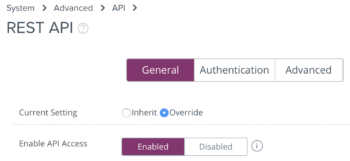
- Ensure that Enable API Access is selected.
- Add a new API key, and label it “GroundControl”.

- Copy the newly created API key and paste it into MAM’s API Key field.
- Enter the hostname of the REST API URL, for example “as700.awmdm.com”. Do not include “https” or a trailing slash.
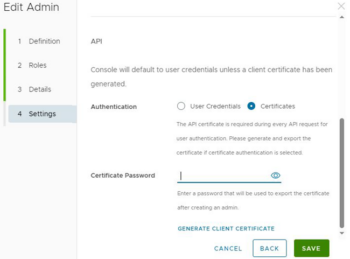
NOTE: This may be different from your AW console URL. See Omnissa KB 82724 for more information. - After enabling APIs, create a dedicated administrator account for API authentication, ensuring the administrator has a role of “Console Administrator” or above. Then, select an authentication method using Option 1 or 2 below.
Step 3: Configure the App Config in Workspace ONE
- In the MAM console, in the Android Locker App Configuration section, click Show details.
- Copy the AppConfig values from the Android Locker App Configuration section using the copy to clipboard icon next to each item.
- Mobile Access Management MDM ID
- Mobile Access Management Server
- Device Identifier
NOTE: The Device Identifier AppConfig value is formatted differently, depending on your MDM. You will use these values when configuring AppConfig values in Workspace ONE.
- In the Workspace ONE UEM console, specify the user groups that will receive the Imprivata Locker (Android) app.
- On the distribution screen, name the assignment and in the Assignment Groups field, enter the name of the user group or smart group.
- Configure how to deploy Imprivata Locker. Select Auto.
- From the menu on the left, click Application Configuration.
- Add three new keys for the AppConfig and paste the values you copied from the MAM MDM tab:
- Mobile Access Management MDM ID
- Mobile Access Management Server
- Device Identifier
- To enable the use of Android passcodes to unlock the device, add a new key for the AppConfig and set a Value: Configuration Flags and enrollAndroidPIN.
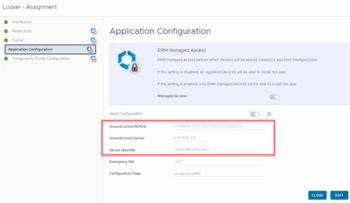
- Save the change, then click Save and Publish, then Publish.
The Workspace ONE Launcher and Deploying Apps
How you deploy the Imprivata Locker Android and other apps to your users depends on whether the devices are configured to use the native system launcher or the Workspace ONE launcher.
NOTE: Choosing one Launcher deployment type over the other is based on the level of access your organization wants users to have on the mobile device. Each deployment type has corresponding configuration tasks.
Consider the following:
- Workspace ONE Launcher—The Workspace ONE Launcher gives you greater control of the device by limiting what users can access.
For example, you can define a specific set of apps that are available to users, while preventing access to system settings and other functionality.
To configure Imprivata Locker Android and other apps with the Workspace ONE Launcher, see Configure Android Locker App and Workspace ONE Launcher. - Native system launcher—The native system launcher gives users greater access to the device.
For example, users can change system settings, customize the home screen, and generally manage the device as if it were their own.
To configure Imprivata Locker Android and other apps using the native system launcher (without the Workspace ONE Launcher), see Configure Android Locker App and Native Launcher.
Configure Android Locker App and Workspace ONE Launcher
For deployments using the Workspace ONE launcher, the following profiles are required:
- A profile for the Workspace ONE Launcher that distributes the Imprivata Locker app for Android and other user apps. In addition, this profile makes all of the required Android packages accessible to the device, but hidden from users.
- A profile that enables permissions for all of the apps on the devices and enables Lock Task mode.
Step 1: Configure the Workspace ONE Launcher Profile
- In the Workspace ONE UEM console, open your Android Device Profile.
- Click Add Version to enable the profile editing.
- Click Launcher and then click Configure.
- In the Multi app block, click Select. The Launcher canvas appears.
- Click Layout, and then configure elements such as the icon grid and orientation preference.
- Under the App section, select Public from the list.
- Under the Launcher section, in Advanced Launcher settings, select Use Legacy Launcher APIs.
- Drag and drop the Imprivata Locker apps to the Launcher canvas, and then organize any other required apps.
- Select Miscellaneous from the list, click Add an App, and then enter the following:
- In the Application Name field, enter “Settings”.
- In the Application ID field, enter “com.android.settings”, and then click Add.
- Using the Miscellaneous value, continue to add the remaining required packages:
- System UI (com.android.systemui)
- NFC (com.android.nfc)
- Accessibility (com.samsung.accessibility) – required for Android 9 and later on Samsung devices.
- Open the Hidden Apps tab and drag and drop Settings, System UI, NFC, and if required, Accessibility to the Launcher canvas and then click Save. Click Save & Publish.
Step 2: Configure Lock Task and Add Locker App to Allowlist
To configure lock task mode and add the Imprivata Locker app to the allowlist:
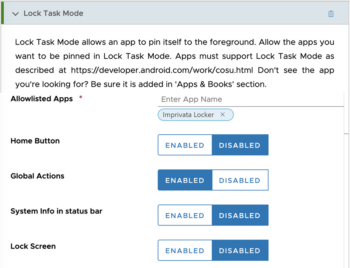
- In the Workspace ONE UEM console, expand the Lock Task Mode section to specify the lock task mode settings.
- From the Allowlisted Apps field, select Imprivata Locker.
- For the Home Button, select Disabled.
- For the Global Actions, select Enabled. This allows device reboot.
- Set System Info in status bar to Disabled.
- For the Lock Screen, select Disabled.
Step 3: Grant All Permissions to the Imprivata Locker Android App
Enabling permissions prevents users from being prompted to allow permissions manually. The Imprivata Locker app requires permission to:
- Draw over (overlay) other apps.
- Read notifications and access notifications.
To enable permissions:
- In the Workspace ONE UEM console, click Devices > Profiles and Resources > Profiles. The Profiles screen appears.
- Click Add > Add Profile, and then click Android.
- Complete the following General settings:
- Enter a name.
- In the Smart Groups field, assign the same user groups that was assigned to the previous profile.
- Click Permissions, and then click Configure. The Permissions screen appears.
- From the Permission Policy list, select Grant all permissions, and then click Save and Publish.
The Profiles screen appears and lists the new profile.
Configure Android Locker App and Native Launcher
Step 1: Configure Lock Task and Add Locker App to Allowlist
To configure lock task mode and add the Imprivata Locker app to the allowlist:
- In the Workspace ONE UEM console, expand the Lock Task Mode section to specify the lock task mode settings.
- From the Allowlisted Apps field, select Imprivata Locker.
- For the Home Button, select Disabled.
- For the Global Actions, select Enabled. This allows device reboot.
- Set System Info in status bar to Disabled.
- For the Lock Screen, select Disabled.

Step 2: Grant All Permissions to the Imprivata Locker Android App
Enabling permissions prevents users from being prompted to allow permissions manually. The Imprivata Locker app requires permission to:
- Draw over (overlay) other apps.
- Read notifications and access notifications.
To enable permissions:
- In the Workspace ONE UEM console, click Devices > Profiles and Resources > Profiles. The Profiles screen appears.
- Click Add > Add Profile, and then click Android.
- Complete the following General settings:
- Enter a name.
- In the Smart Groups field, assign the same user groups that was assigned to the previous profile.
- Click Permissions, and then click Configure. The Permissions screen appears.
- From the Permission Policy list, select Grant all permissions, and then click Save and Publish.
The Profiles screen appears and lists the new profile.


